

Setup & config options
Suitable power supply
RasPi & sFTP file transfer
Home network print server
Home network scan server
Mesh : home Lan USB drive
Explore hard & software
UFW firewall explained
Secured by fail2ban server
Software packaging & PPA
Apache 2.4+ LAMP server
https web server : port 443
Varnish caching proxy
Module : cgi & perl
Module : geoip
Modules : php & mysql
http*s error handling
Server : conditional logging
TL-domain & dynamic DNS
Webalizer log analyser
Defeat referrer spam
robots.txt & xml sitemaps
Server : .htaccess handling
The game & not the islands
Setup & config options
North Atlantic : Macaronésia
🚫 No ads & tracking
![]()
![]()
![]()
![]()
![]()
The prologue
Most of the articles, descriptions and instructions written here are applicable to the most common Debian-based Linux derivatives. Depending on the respective operating system, there may be minor or major discrepancies.  This website is for educational purposes only. Please do not deploy anything in manufacturing plants.
No warranty or compensation is given for loss of data or hardware.
It should be also mentioned that this modest web server is hosted on a Raspberry Pi type 4B at home.
The Raspberry Pi mini-computer board as multi-purpose server deployed
A competent allrounder for domestic purposes and micro-enterprises
![]()
![]()
Raspberry Pi is a series of small single-board computers (SBCs) developed in the United Kingdom by the Raspberry Pi Foundation in association with Broadcom. The mini-computer with its armv7l processor has quickly become the favourite of hobbyists. Projects can be started with suitable Linux distributions. Even an aged RasPi e.g. the models 2B and 2B+ can definitely serve to simple tasks quite well.
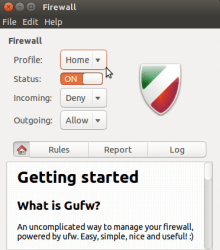
Install & configure the socalled »ufw« | Uncomplicated firewall with Linux
Illustrative presentation : Workstations or Handhelds ⟷ »ufw« ⟷ Modem/Router ⟷ World Wide Web
The »ufw« is a front end application for »iptables«. Here you get the basic handling to the personal firewall - but effective one - to IPv4 & IPv6. The »ufw« is a comfortable command line application for managing the personal »iptables« rules under Linux. All rules are processed in the order of the configuration file(s) from the top to the bottom.
The paths to the file locations are /lib/ufw and /etc/ufw.
The »ufw« is not installed by default with any Linux derivate like Fedora, Ubuntu, Mint, Debian or Raspbian. So start the terminal program preferred PuTTy.
Do not close the terminal client until the firewall is readily made and activated.
»gufw« (universe, optional graphical user interface)
user@raspberry:~ $ sudo su
root@raspberry:# apt install ufw gufw
The firewall is not enabled yet. Primarily we set now our own rules.
At first we allow access from the entire home subnet - this is not an essential act, but in case something went wrong with the firewall configuration so we have some precaution. We grant every single computer in the home network (mesh). Note that 192.168.x.0/24 may vary from router to router. Some have 192.168.0.0/24 or 192.168.178.0/24 or whatever. Consult the modem / router UI to get the correct subnet address or simply use the command ifconfig (Linux) and ipconfig (MS Windows) in terminal's command line.
root@raspberry:# ufw allow from 192.168.0.0/24 to any
Make setting up the firewall easier is to define two default rules for allowing and denying incoming & outgoing transfers.
root@raspberry:# ufw default deny incoming
root@raspberry:# ufw default allow outgoing
As next we open the standard ports for the protocols.
- ftp, sftp (21)
- SSH (22)
- http (80)
- https (443, SSL if required)
Skip the ports 21 and 22 if any access will be made within the home network (mesh) only.
Within this demonstration the ports 21 and 22 are dismissed, also the IPv6 protocol.
root@raspberry:# ufw allow 21/tcp
root@raspberry:# ufw allow 22/tcp
root@raspberry:# ufw allow 80/tcp
root@raspberry:# ufw allow 443/tcp
In case it has »MySQL«, »Varnish Cache Proxy« or a dedicated game server presently operating, open as well as the specific port(s).
Now proof the own configuration. Fire up the brickwall.
root@raspberry:# ufw enable
          Command may disrupt existing ssh transfers.
          Proceed with operation (y|n)? y
          Firewall is active and enabled on system startup
Probably you have to close and restart the terminal program for SSH transfers to the Linux based web server, Raspberry Pi.
root@raspberry:# ufw status verbose
          Status: active
          Logging: on (low)
          Default: deny (incoming), allow (outgoing), disabled (routed)
          New profiles: skip

          To                         Action      From
          --                         ------      ----
          Anywhere                   ALLOW       192.168.0.0/24
          80/tcp                     ALLOW       Anywhere
          443/tcp                    ALLOW       Anywhere
Something or more went wrong ? Got new ideas ? No problem.
Just reset all custom settings and start from the beginning.
root@raspberry:# ufw disable
root@raspberry:# ufw reset
05-Jun 2018
Updated 04-Feb 2024
»ufw« Uncomplicated firewall | »deny« or »reject« access for clients unwanted
Very effective to defeat and minimize referral spam and visitor unwanted from certain servers (countrywise).
That is quit simple. The demonstration shows you how to block a single IP and a IP-range/subnet.
root@raspberry:# ufw deny from 46.95.148.45 to any
Instead of deny you can also use reject.
»deny« will keep the program waiting until the connection attempt times out, some short time later.
»reject« will produce an immediate and very informative »Connection refused« message to the client.
A refused connection lets real human beings know that it is strong policy decision. Webbots do not :)
root@raspberry:# ufw deny from 46.95.148.45 to any
root@raspberry:# ufw reject from 178.137.0.0/16 to any
Rule added
After making changes, reload »ufw«.
root@raspberry:# ufw reload
Firewall reloaded
root@raspberry:# ufw status verbose
          Status: active
          Logging: on (low)
          Default: deny (incoming), allow (outgoing), disabled (routed)
          New profiles: skip

          To                         Action      From
          --                         ------      ----
          Anywhere                   ALLOW       192.168.0.0/24
          Anywhere                   DENY        46.95.148.45
          Anywhere                   REJECT      178.137.0.0/16
          80/tcp                     ALLOW       Anywhere
          443/tcp                    ALLOW       Anywhere
          ...
 You have to have to set the rules for »80/tcp« and »443/tcp« after the banned IP adresses.
Now in the shortest story.
- First set the new rules for all the IP adresses you want to ban (deny, reject)
- Then delete the rules for »80/tcp« and »443/tcp« (see below how to do)
- Renew both rules by the commands »ufw allow 80/tcp« and »ufw allow 443/tcp«
- Command »ufw reload«
- Command »ufw status verbose« to see if everything is correctly set
What happens with an existing rule ?
Skipping adding existing rule
How to remove a rule from »ufw« ?
root@raspberry:# ufw status numbered
          Status: active

               To                    Action      From
               --                    ------      ----
          [ 1] Anywhere              ALLOW IN    192.168.0.0/24
          [ 2] Anywhere              DENY IN     46.95.148.45
          [ 3] Anywhere              REJECT IN   178.137.0.0/16
          [ 4] 80/tcp                ALLOW IN    Anywhere
          [ 5] 443/tcp               ALLOW IN    Anywhere
          ...
root@raspberry:# ufw delete 4
Deleting:
allow 80/tcp
Proceed with operation (y|n)? y
root@raspberry:# ufw reload
Firewall reloaded
How to disable »ufw«
root@raspberry:# ufw disable
![]() https://dnslytics.com - Ultimate online investigation tool.
https://dnslytics.com - Ultimate online investigation tool.
Remark: the free usage has a limit per day, just erase cookies and go ahead with a new IP address then.
05-Jun 2018
Updated 04-Feb 2024
Insert a new rule uncomplicated to a desired position
Simply made.
Example : #1 and #15 are the positions to insert to. The existing rule will not be overwritten.
root@raspberry:# ufw insert 15 reject from 11.22.33.44 to any
root@raspberry:# ufw reload
root@raspberry:# ufw insert 1 deny 80/tcp
root@raspberry:# ufw reload
18-Jun 2021
Commenting with »ufw«
If you add exactly same rule, then the existing rule gets overwritten and comment is updated there.
Within some installations »ufw« does not update rules. You'll need to delete and recreate the rule.
root@raspberry:# ufw reject from 11.22.33.44 to any comment "Comment here"
[54] Anywhere REJECT IN 11.22.33.44 # Comment here
»ufw« Logging
Log levels can be set to off low medium high. The default setting is low
The path to the logging file is /var/log/ufw.log
root@raspberry:# ufw logging medium
Logging enabled
Enable / disable IPv6
If supported, it would help to enable or disable the firewall configuration for the IPv6 (Internet Protocol, version 6) on Linux.
root@raspberry:# nano /etc/default/ufw
IPV6=no/yes
root@raspberry:# ufw disable && ufw enable
»ufw« Help and manual
root@raspberry:# man ufw
More information about ![]() https://wiki.ubuntu.com/UncomplicatedFirewall
https://wiki.ubuntu.com/UncomplicatedFirewall
»ufw« Troubleshooting | Access to server has refused ❓
What a pity. You enabled »ufw« and forgot to allow something or did the setup in a wrong sequence.
Identify /etc/ufw/ufw.conf on the (micro) SD-card and set ENABLED=yes to ENABLED=no . Administrative rights is needed to do so. Next time boot »ufw« is inactive.
          # /etc/ufw/ufw.conf

          # Set to yes to start on boot. If setting this remotely, be sure to
          # add a rule to allow the remote connection before starting ufw.
          # Eg: 'ufw allow 22/tcp'
          ENABLED=yes

          # Please use the 'ufw' command to set the loglevel.
          # Eg: 'ufw logging medium'.
          # See 'man ufw' for details.
          LOGLEVEL=low
➊ Method for Debian Linux or similar
Take the (micro)SD-card out from the Raspberry Pi and put the card in an internal or external card reader connected to a desktop, laptop or whatever. Browse with the file manager e.g. »Nautilus« to the directory /etc/ufw
and choose by the right mouse-button »Open in Terminal«. Log in as superuser with the Linux password and not with the Raspberry password.
user@ubuntu:/media/user/27840c60-cecb- ... 28231c/etc/ufw$ sudo su
[sudo] Password for user:
root@ubuntu:/media/user/27840c60-cecb- ... 28231c/etc/ufw# nano ufw.conf
Mod and save the file Crtl O and close Crtl X . That's it. Back with the card and fire up the Raspberry Pi.
➋ Method for MS Windows
Rules out since MS Windows can't read »debianized« SD-cards. You'll see some files for boot needed.
➌ Method for Mac OS X
Sorry, I have no clue about Mac OS X systems. Probably possible somehow.
05-Jun 2018
Updated 08-Feb 2021