

Setup & config options
Suitable power supply
RasPi & sFTP file transfer
Home network print server
Home network scan server
Mesh : home Lan USB drive
Explore hard & software
UFW firewall explained
Secured by fail2ban server
Software packaging & PPA
Apache 2.4+ LAMP server
https web server : port 443
Varnish caching proxy
Module : cgi & perl
Module : geoip
Modules : php & mysql
http*s error handling
Server : conditional logging
TL-domain & dynamic DNS
Webalizer log analyser
Defeat referrer spam
robots.txt & xml sitemaps
Server : .htaccess handling
The game & not the islands
Setup & config options
North Atlantic : Macaronésia
🚫 No ads & tracking
![]()
![]()
![]()
![]()
![]()
The prologue
Most of the articles, descriptions and instructions written here are applicable to the most common Debian-based Linux derivatives. Depending on the respective operating system, there may be minor or major discrepancies.  This website is for educational purposes only. Please do not deploy anything in manufacturing plants.
No warranty or compensation is given for loss of data or hardware.
It should be also mentioned that this modest web server is hosted on a Raspberry Pi type 4B at home.
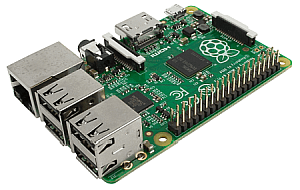
The Raspberry Pi mini-computer board as multi-purpose server deployed
A competent allrounder for domestic purposes and micro-enterprises
![]()
![]()
Raspberry Pi is a series of small single-board computers (SBCs) developed in the United Kingdom by the Raspberry Pi Foundation in association with Broadcom. The mini-computer with its armv7l processor has quickly become the favourite of hobbyists. Projects can be started with suitable Linux distributions. Even an aged RasPi e.g. the models 2B and 2B+ can definitely serve to simple tasks quite well.
Essential security update regarding SSH
At first, SSH will be disabled by default on Raspbian OS images.
SSH (Secure SHell) is a networking protocol which allows you to remotely log into a Linux computer and control it from a remote command line. As mentioned above, many Pi owners use it to install a Pi headless (without screen or keyboard) and control it from another PC.
In the past SSH was enabled by default, so people using their Pi headless could easily update their SD card to a new image. Switching SSH on or off has always required the use of »raspi-config« or the Raspberry Pi configuration application, but to access those, you need a screen and keyboard connected to the Pi itself, which is not the case in headless applications. So we’ve provided a simple mechanism for enabling SSH before an image is booted.
The boot partition on a Pi should be accessible from any machine with SD card reader, on Windows, Mac, or Linux.
If you want to enable SSH, all you need to do is to put an empty file called »ssh« without any file extension in the /boot/ directory.
When the Pi boots, it looks for this file; if it finds it, it enables SSH and then deletes the file. SSH can still be turned on or off from the Raspberry Pi configuration application or »raspi-config« This is simply an additional way to turn it on if you can’t easily run either of those applications.
Source ![]() The Raspberry Pi blog : A security update for Raspbian, Nov 2016
The Raspberry Pi blog : A security update for Raspbian, Nov 2016
Troubleshooting to newly created Raspbian OS image on microSD card
A fresh OS image is written on the microSD card and you can not copy an empty »ssh« file on it because an error says "write protected" or "read-only" ? Remove the microSD card from the card reader slot or from wherever and reinsert.
24-Dec 2021
Raspbian Debian OS Long Term Support (LTS) and End Of Life (EOL)
Raspbian Debian Long Term Support is a project to extend the lifetime of all Raspbian Debian stable releases to (at least) 5 years. LTS will not be handled by the Debian security team, but by a separate group of volunteers and companies interested in making it a success.
| Versions | Supported architectures | EOL Schedules (End Of Life) |
| Debian 8 »Jessie« | i386, amd64, ARMel and ARMhf | from June 2018 to end of April 2020 |
| Debian 9 »Stretch« | i386, amd64, ARMel and ARMhf | June 2017 to end of June 2022 |
| Debian 10 »Buster« | i386, amd64, ARMel and ARMhf | June 2019 to end of August 2024 |
| Debian 11 »Bullseye« | i386, amd64, ARMel and ARMhf | August 2021 to yet unknown in 2026 |
| Debian 12 »Bookworm« | i386, amd64, ARMel and ARMhf | June 2023 to yet unknown in 2028 |
22-Jun 2017
Updated 11-Jan 2025
Why using a Raspberry Pi mini computer board
If you are looking for a way to make a cheap http server, primarily to be used as a testing environment or to store files, then the Raspberry Pi is perfect for you. What is a Raspberry Pi? It is an inexpensive mini computer, perfect for basic functions. This guide will show you how to take a new Raspberry Pi.
For normal craft projects I recommend the 1 GB or 2 GB model. More RAM only makes sense if you want to use the Raspberry Pi as a desktop computer, want to run programs like Office, web browser, Gimp etc. or need a lot of RAM for other reasons. For undemanding craft or server projects, 1 GB or 2 GB are perfectly adequate.
Please note that we will be working primarily under Microsoft Windows.
❶ Minimal hardware requirements for headless mode
The Raspberry Pi 2B+ model is the second generation Raspberry Pi.
It replaced the original Raspberry Pi 1B+ model in February 2015.
A 900MHz quad-core ARM Cortex-A7 CPU.
1GB RAM.
4 USB ports.
40 GPIO pins.
Full HDMI port.
Ethernet port.
Combined 3.5mm audio jack and composite video.
Camera interface (CSI).
Display interface (DSI).
Micro SD card slot.
VideoCore IV 3D graphics core.

5V 2A Power supply micro USB AC adapter charger for Raspberry Pi.
Note : Raspberry Pis are fused normally with 1,1 [A].
Question : can I power the Raspberry from a USB hub ?
Answer : it depends on the hub. Some hubs comply with the USB 2.0 standard and only provide 500 [mA] per port, which may power enough your Raspberry Pi in the standalone mode.
Just give it a try for your needs if you got the right cable handy.
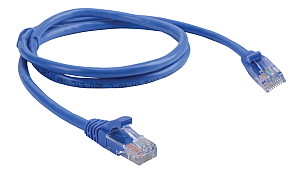
Ethernet patchcable with standard RJ45 connectors.
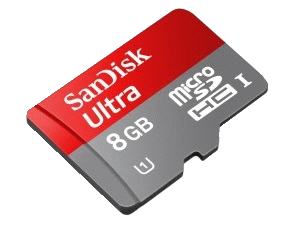
microSD 8GB or 16 GB class 10 memory card
inclusive SD adapter if needed.
❷ Raspbian | The right operating system
Obtain a copy of the ![]() Raspberry Pi Raspbian OS.
Raspberry Pi Raspbian OS.
There are a few different distributions available, but for this article, we will use the "Raspbian" version.
Extract the image to the SD card. To do this, we need a tool called ![]() Win32 Disc Imager.
Win32 Disc Imager.
Now open the tool, navigate to the correct drive letter that your SD card is in, select the location of the Raspberry Pi OS image, and select [Write].
Once done writing, you can place the micro SD card into your Raspberry Pi, then plug in the rest of the cables :
- LAN ethernet port Raspberry Pi to LAN ethernet port Modem/Router
- plug in the Micro USB last (power supply)
❸ Get the home network (mesh) IP address
The Raspberry Pi is automatically set to obtain an IP address from your wired or wireless network. Why does the Raspberry Pi need an IP address? This address is needed so that any traffic destined for your Raspberry Pi will be able to find it on the network.
If you have received a modem or router from your internet provider for your home network and DHCP is active we can obtain the IP address of the Raspberry Pi there, then we must not connect a display and keyboard (headless mode)
Access your modem / router and look in point »Home Network« or »Mesh«, which IP address with the name »raspberrypi« was awarded e.g. 192.168.0.24 .
Or - if you know it - simply from the command line via »PuTTy« terminal client or similar software.
user@raspberry:~ $ ifconfig
        eth0  Link encap:Ethernet  HWaddr b7:26:eb:67:5c:ce
              inet addr:192.168.0.24  Bcast:192.168.0.255  Mask:255.255.255.0
              ...
192.168.0.24 is the mesh IP address to the RasPi.
❹ Remote access via PuTTy SSH client
I recommend to create a profile for your connection so you don't need to configure it every time you want to start it. Start Putty and type in the »Host Name« or »IP address« field the Raspberry Pi's IP address (usually something like 192.168.0.xx).
![]()
Download a SSH and telnet client like »PuTTy« ![]() www.putty.org/ which is for free.
www.putty.org/ which is for free.
»PuTTy« is open source software that is available with source code and is developed and supported by a group of volunteers. A zip-file containing all the binaries, and also the help files.
If not already set, enter 22 as Port and select SSH as Protocol. Go to »Connection & Data« and type your Raspberry Pi's username in Auto-Login username. Now your profile is complete, you can save it under Session by typing a name for your profile under Saved Sessions and clicking on the Save button.
To establish a connection to your Raspberry Pi simply click on »Load« and »Open«. In first time usage usually the security warning is shown. Confirm with Yes.
The default username is »pi« and the default password is »raspberry«.
login as: pi
pi@192.168.178.36's password: raspberry
user@raspberry:~ $ ▁
Here is how to use a terminal command to switch to the »superuser«.
user@raspberry:~ $ sudo su
root@raspberry:~# ▁
❺ Configuration with »raspi-config« application
root@raspberry:~# raspi-config
»raspi-config« is the internal Raspberry Pi software configuration tool. This page describes the console based ![]() raspi-config application. It targets the Raspberry Pi OS.
raspi-config application. It targets the Raspberry Pi OS.
If the GUI looks different, perform [Update] first.
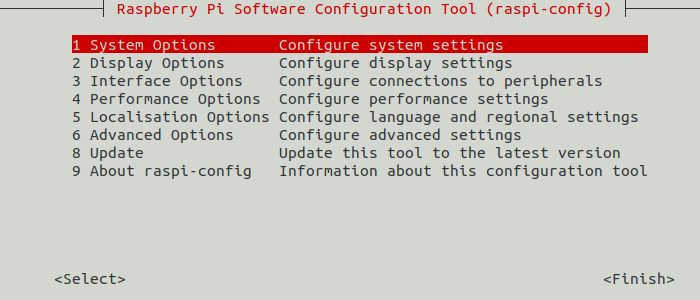
[System Options] → [Password] is the primary task to do.

Set in [Performance Options] → [GPU Memory] down to 16MB if the RasPi works in the socalled headless mode. Some RasPi models let allow to set to the minimum of 0MB.

Go to [Localisation Options] → set the correct [Locale] and [Timezone].
REMEMBER THE NEW PASSWORD. Exit and [Finish] »raspi-config«. A reboot is needed.
11-Feb 2018
Updated 10-Feb 2021
❻ Essential first-time Raspbian updates
Running a fresh version of Raspbian Debian needs some housecleaning and updating to do.
Going to update the software sources then upgrade any pre-installed packages.
Type the following commands step by step :
user@raspberry:~ $ sudo su
root@raspberry:# apt update
root@raspberry:# apt upgrade
root@raspberry:# apt dist-upgrade
root@raspberry:# shutdown -r now
Alternatively :
user@raspberry:~ $ sudo su
root@raspberry:# sudo apt update && apt upgrade && apt dist-upgrade
root@raspberry:# shutdown -r now
❼ Tidy up the system
The package management via apt runs hand-in-hand with the /etc/apt/sources.list.
All of these commands must be run as root or with superuser privileges.
user@raspberry:~ $ sudo su
Removes all packages from the package cache :
root@raspberry:~# apt clean
This command removes *.deb-files for packages that are no longer installed on your system.
Depending on your installation habits, removing these files from /var/cache/apt/ archive may regain a significant amount of diskspace.
root@raspberry:~# apt autoclean
This command removes packages that were installed by other packages and are no longer needed :
root@raspberry:~# apt autoremove
Alternatively all together :
root@raspberry:~# apt clean && apt autoclean && apt autoremove
That clears the bash command line history buffer in terminal client.
root@raspberry:~# history -c && history -w
A simple bash script for Raspbian Debian package updates, upgrades and cleaning
root@raspberry:/home/pi# nano upd
        #!/bin/bash
        echo
        clear
        echo dpkg --configure -a
        # Remove the # to apply
        # echo Clear apt-lists and Recycle Bin.
        # rm -rf /var/lib/apt/lists/*
        # rm -rf ~/.local/share/Trash/*
        echo
        x=3
        while [ $x -gt 0 ]
        do
        sleep 1s
        echo "$x ..."
        x=$(( $x - 1 ))
        done
        sleep 1
        echo 0 ...
        echo
        echo apt update
        apt update && apt upgrade && apt dist-upgrade
        echo
        x=3
        while [ $x -gt 0 ]
        do
        sleep 1s
        echo "$x ..."
        x=$(( $x - 1 ))
        done
        sleep 1
        echo 0 ...
        echo
        echo apt clean
        apt  clean && apt autoclean && apt autoremove --purge
        echo
        echo Finished !
        echo
Save Crtl O the script as »upd« in /home/pi/.
Exit editor Crtl X and make it executable.
root@raspberry:/home/pi# chmod 744 upd
Testing :
root@raspberry:/home/pi# sh upd
22-Jun 2017
Updated 05-Dec 2021
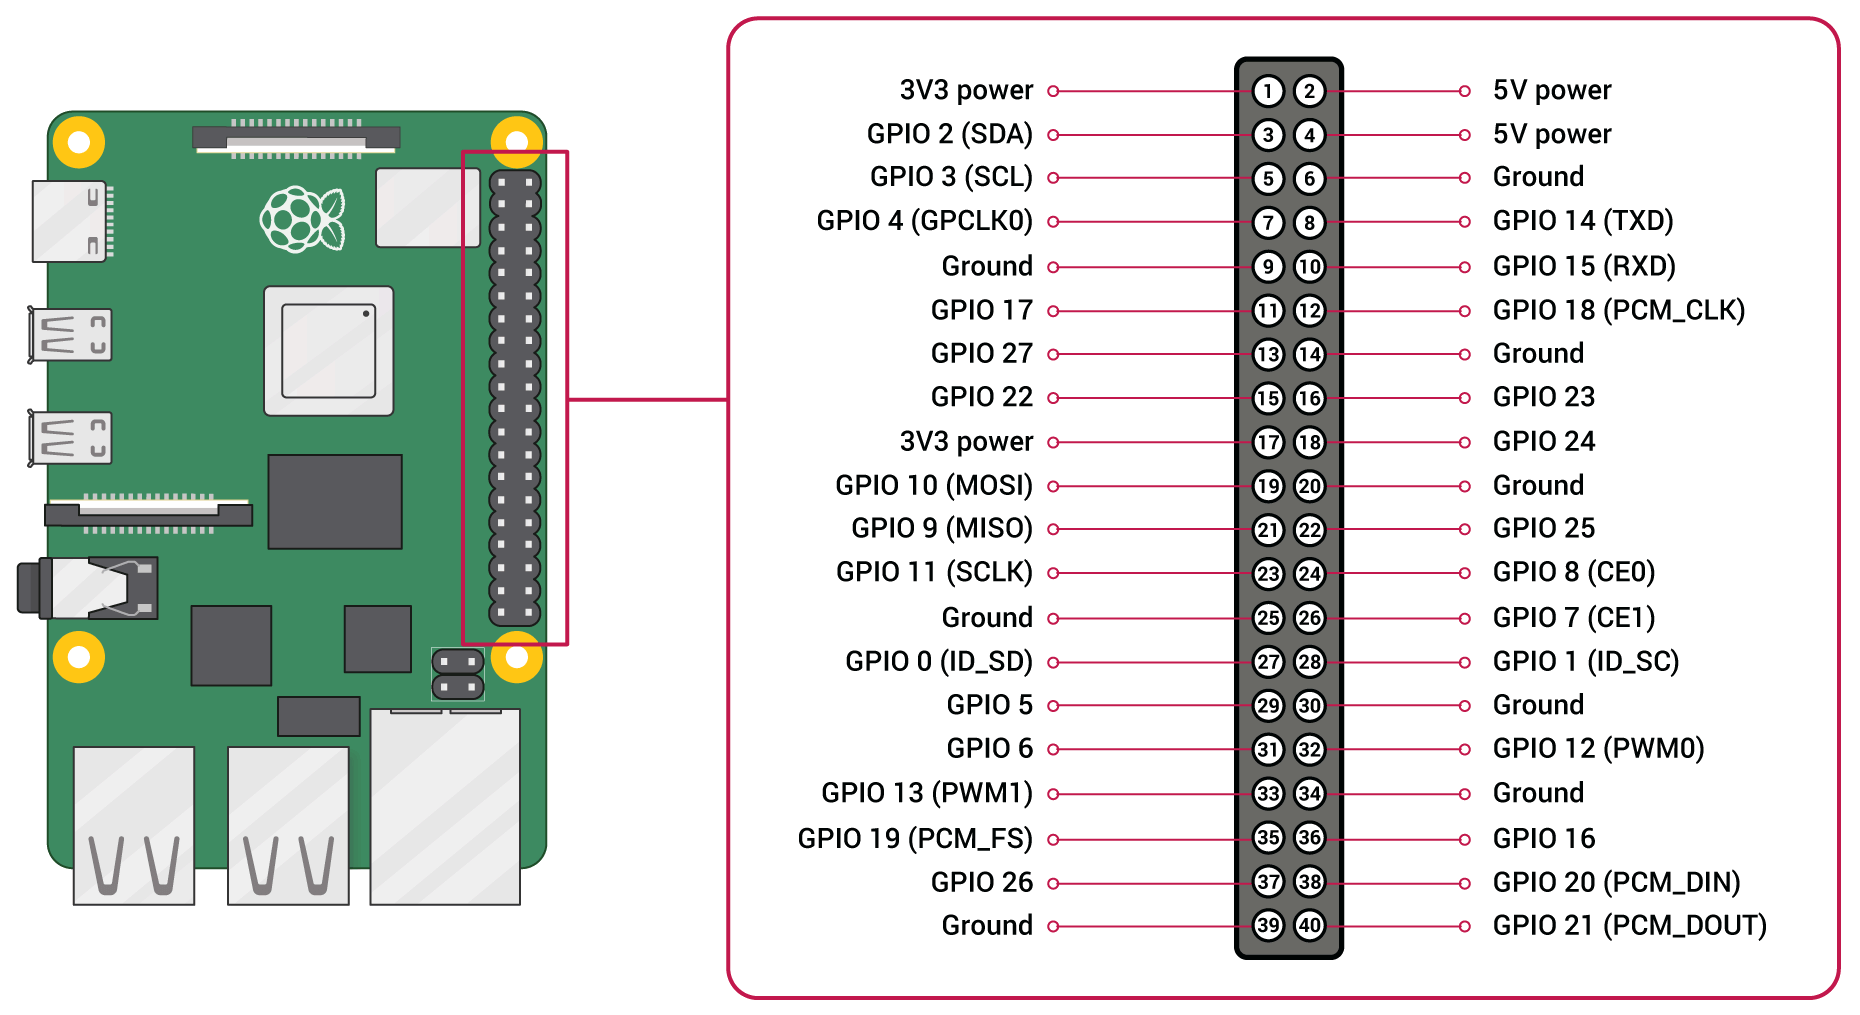
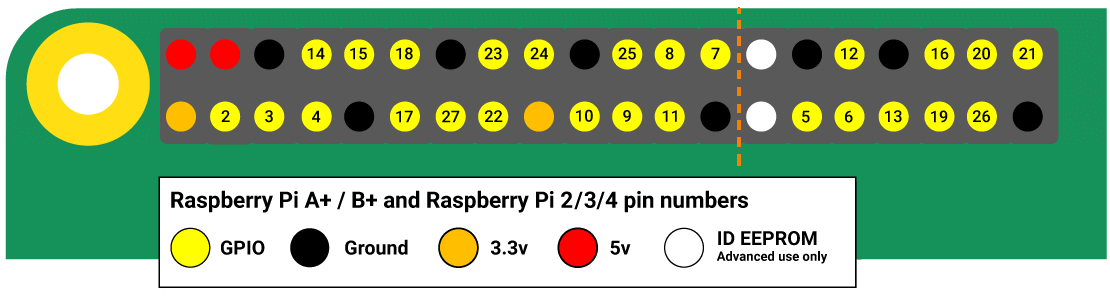
GPIO in details | The 26-pin and 40-pin header with pin numbers
GPIO means General-Purpose Input / Output. Any of the pins can be software-wise designated as an input or output pin and deployed for a wide range of applications e.g. technical controls at home.
 Click on each image to get an enlarged version in a new tab.
Raspberry Pi versions A+ / B+ : 26-pin header
Raspberry Pi versions 2 / 3 / 4 : 40-pin header
![]() //dosboot.org/workshop-tutorials/linux-fancontrol-pwm-pwmconfig.html The proper fan control.
//dosboot.org/workshop-tutorials/linux-fancontrol-pwm-pwmconfig.html The proper fan control.
05-Dec 2021
Updated 03-Jan 2021
ext4-Defragmentation
The ext4 is the fourth extended filesystem developed for the Linux kernel. It is the successor to ext3 and, like ext3, is a journaling file system. Unlike ext3, however, journaling can also be switched off.
Typically you really don’t need to defrag, people aren’t totally off base when they say this. But if you’ve been deleting a ton of files and then adding a ton of files and really filling up large amounts of space on your drive you might want to defrag. Else no need to do.
root@raspberry:# e4defrag /
22-Jun 2017
Updated 05-Dec 2021
Rasberry Pi | What does the »rpi-update« tool do by Hexxeh
Upgrading to a newer version of Kernel.
Raspberry Pi firmware updater by Hexxeh, enhanced by AndrewS and Dom
»rpi-update« is a tool to upgrade the firmware for your Raspberry Pi mini computer.
Firmware is a small package of code that usually lives on a special chip of a computer that helps the software know how to talk to the hardware. However, in the case of the Raspberry Pi, the firmware will live on the first partition of the SD card.
![]() https://www.raspberrypi.org/forums/viewtopic.php?f=29&t=197689
https://www.raspberrypi.org/forums/viewtopic.php?f=29&t=197689
user@raspberry:~ $ sudo su
root@raspberry:# rpi-update
        root@raspberry:# rpi-update
        *** Raspberry Pi firmware updater by Hexxeh, enhanced by AndrewS and Dom
        *** Performing self-update
        *** Relaunching after update
        *** Raspberry Pi firmware updater by Hexxeh, enhanced by AndrewS and Dom
        ##################################################################
        WARNING: 'rpi-update' updates to pre-releases of the linux
        kernel tree and Videocore firmware.

        'rpi-update' should only be used if there is a specific
        reason to do so - for example, a request by a Raspberry Pi
        engineer.

         DO NOT USE 'RPI-UPDATE' AS PART OF A REGULAR UPDATE PROCESS !

        ##################################################################
        Would you like to proceed? (y/N)
        *** Downloading specific firmware revision (this will take a f ...
        % Total    % Received % Xferd  Average Speed   Time    Time
            Dload  Upload   Total   Spent    Left  Speed
            100   168    0   168    0     0    277      0 --:--:-- --: ...
            100 55.1M  100 55.1M    0     0  1455k      0  0:00:38  0: ...
        *** Updating firmware
        *** Updating kernel modules
        *** depmod 4.14.18-v7+
        *** depmod 4.14.18+
        *** Updating VideoCore libraries
        *** Using HardFP libraries
        *** Updating SDK
        *** Running ldconfig
        *** Storing current firmware revision
        *** Deleting downloaded files
        *** Syncing changes to disk
        *** If no errors appeared, your firmware was successfully updated
        *** A reboot is needed to activate the new firmware
root@raspberry:# shutdown -r now
The »rpi-update« tool is included in the Raspbian distribution of Linux because it is a useful software tool that manages the firmware of your Pi's.
Each of these functions is separate, and updating one will not update the other. Upgrading your distribution to the latest software packages might get you a new version of »rpi-update«, but unless you execute »rpi-update« your firmware will not get updated.
11-Feb 2018
Updated 07-Feb 2021
Show RasPi's CPU and RAM memory usage
Quit »top« by : Crtl C If not yet installed by default :
root@raspberry:~# apt install top
root@raspberry:~# top -i
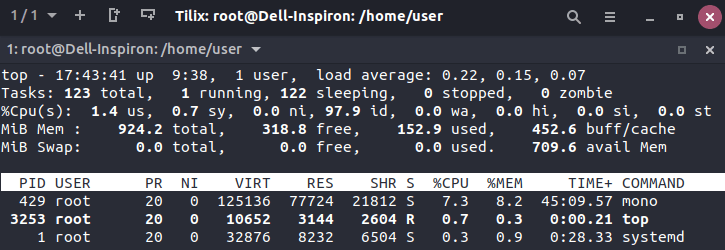
»buff/cache« is very high and how free / reset the ratio of the »buff/cache« memory with Raspbian ?
root@raspberry:~# sync; echo 1 > /proc/sys/vm/drop_caches

»buff/cache« is memory that is used for disk caching, and that will be freed when any application or web server installed require it. We do not have to worry if a large ratio is being shown in this field, as it counts as temporarily used RAM memory.
10-Feb 2021
Updated 05-Dec-2021
Raspberry Pi OS receives essential update
 About two months after the last update, Raspberry Pi OS gets another boost to version number 2022-04-04, including an upgrade of the kernel from 5.10.x to 5.15.30.
Click on the image to enlarge in a new tab.
In terms of security, the previously used standard user »pi« will be replaced by an individual user name that the user must create during the first boot process. According to the developers, this could make brute force attacks more difficult. In addition, legislation is currently being introduced in various countries that prohibits devices connected to the internet from being delivered with standard login data.
In this context, there is also a change in the setup wizard that sets up the system after installation. Since the new user name will be created there by the user in future, the option of bypassing the wizard is no longer available. On the Pi OS Lite image, which is shipped without a wizard, a text prompt takes care of setting up the new user.
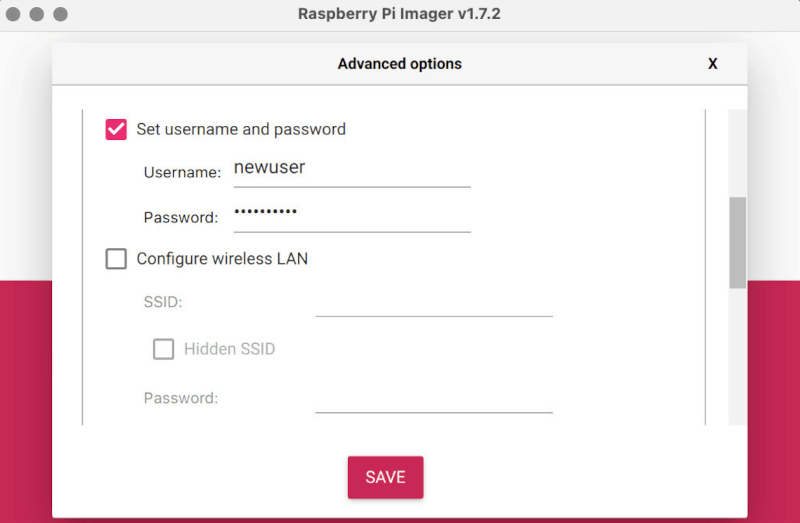
For people who operate their Raspberry Pi headless, i.e. without a display, the tool Raspberry Pi Imager in version 1.7.2 offers the possibility to preconfigure an image with a user account. When an image created in this way is booted for the first time, it appears already logged in with the user created. For existing users, a tool has been integrated to rename the standard user »pi«.
The new command sudo rename-user serves this purpose.
09-Apr 2022
Raspberry Pi | Message of the day MTOD
Amend »modt« to display a custom message in terminal window once successfully logged in.
Clear all /etc/motd and substitude with whatever you would like :)
root@raspberry:# nano /etc/motd
   pi@192.168.0.24's password: *****
   Linux Dosboot 5.10.11-v7+ #1399 SMP Thu Jan 28 12:06:05 GMT 2021 armv7l

             ╔══════════════════════════════════════════╗
             ║       M Y  R A S P B E R R Y  P I        ║
             ╚══════════════════════════════════════════╝

   Last login: Wed Feb 10 10:02:51 2021 from 192.168.0.24
   root@raspberry:/home/pi# █
10-Feb 2021